2. Application Protocol Reverse Engineering
Bluetooth Low Energy (BLE or Bluetooth Smart) technology was born as a personal project of the Finnish company Nokia and only in 2010 was introduced in the Bluetooth 4.0 specification.
BLE has gained importance in the Internet Of Things (IoT) because it wants to ensure low energy consumption while maintaining a good range of communication. This is the reason why the main producers of mobile and desktop OSes provide complete support, allowing to design devices able to communicate with all the most modern platforms.
The reverse engineering work is carried out through two parallel actions:
- Logging and inspection of Bluetooth packages exchanged between the smartphone and the BLE device
- Decompilation of the Android application
This allows to understand the protocol used and exploit the application code to verify its correctness, also to ensure greater consistency with respect to the original specifications.
Note
This guide requires that you have an Android device available. However, there are advantages in using an emulator. If you are interested in this, take a look at the Logging With An Emulator section.
2.1. BLE: Operating Principles
The connection and transmission of data between two devices requires multiple steps and involves multiple elements [1]. The most important high-level components are listed and discussed below.
2.1.1. GAP (Generic Access Profile)
In order to notify the presence of a BLE device to the outside world, a process called advertising is necessary. It basically consists of constantly sending informative packets to devices enabled to use Bluetooth within a certain distance.
What manages the aspects related to the connection, to the advertising and finally determines whether two devices can interact with each other is the GAP, acronym of Generic Access Profile ([2] and [3]).
The division into roles is fundamental. We will distinguish:
- Peripheral devices (or just peripheral), with few resources and extremely variable nature
- Central devices, such as smartphones, tablets and computers with a lot of computing power and memory
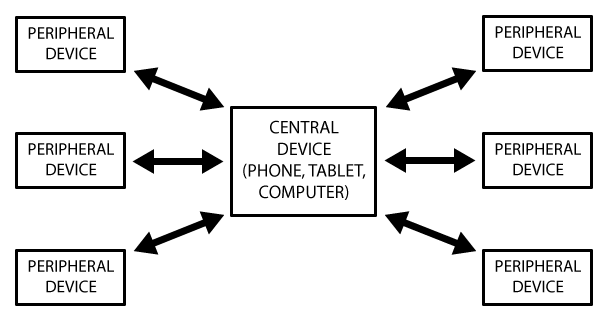
Topology [5]
Peripheral devices cannot be connected to one another, they only communicate with central device one at a time (see Topology 5). Therefore, when a connection is established, they will block the advertising process until the connection is terminated.
In contrast, central devices can simultaneously manage data exchange with multiple devices. Consequently, the communication between two peripheral devices requires the creation of a special system that exploits this possibility.
Usually, the classic BLE devices in IoT (valves, lamps, scales and so on) fall into the type of peripheral devices while the application that manages them is installed on a central device. This is also what respectively happen with the radiator valves and the CalorBT application that we are considering.
2.1.2. GATT (Generic Attribute Profile)
When the connection is established, the bidirectional transmission takes place through the ATT protocol (Attribute Protocol) and uses the concepts of GATT profile, service and characteristic [4], which will be discussed soon.
A significant aspect is given by the relationship that is created between the peripheral device and the central device. The former is referred to as GATT Server (or Slave) as it provides services and characteristics, while the latter is called GATT Client (or Master).
All transactions start from the Master and receive a response from the Slave which, at the time of the first connection, suggests a connection interval. At the end of each interval the Master reconnects to check the availability of new data. This is only a suggestion provided by the peripheral, which however does not place time constraints on the central device.
As already mentioned, GATT transactions are based on hierarchical high-level objects: profiles, services and characteristics (see Hierarchy of profiles, services and characteristics 5).
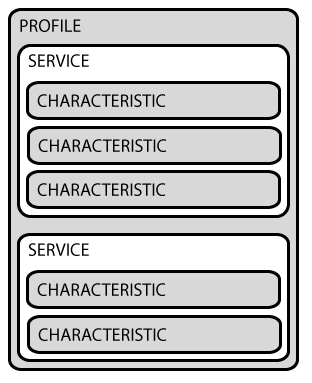
Hierarchy of profiles, services and characteristics [5]
Profiles
Profiles define possible applications of the device, describing its functionality and use cases. The BLE specification provides a wide range of standard profiles that are used in various fields, but also allows manufacturers to create new profiles using GATT. This facilitates the development of innovative applications that still maintain interoperability with other Bluetooth devices.
For example, the “Blood Pressure Profile” and the “Proximity Profile” are predefined profiles. They are designed to be implemented by a blood pressure meter and to monitor the distance between two devices.
Services
Services allow to perform a first and not very detailed logical division of the data. They are composed of one ore more characteristics and are identified through a UUID consisting of:
- 16 bit for the predefined services
- 128 bit for those created specifically by peripheral devices manufacturers
For example, the aforementioned “Blood Pressure Profile” provides the services “Blood Pressure Service” and “Device Information Service”, necessary for the transmission of data about blood pressure and device status.
Characteristics
Characteristics are the main interaction point with the BLE peripheral and represent the most granular layer in the logical data division. Each characteristic handles information related to a single aspect, dealing with the transmission in one or both directions. For this reason they will be given properties such as Read or Write. Like the services, they are also identified through 16 or 128 bit UUIDs.
For example, the “Blood Pressure Measurement” characteristic provided by the “Blood Pressure Service” can be used to read the values measured by the blood pressure meter.
Notifications
As already mentioned, it is usually the GATT Client (the Central device) that initiates a transaction. However, even if they are not represented in the hierarchy, the BLE provides Notifications and Indications so that the GATT Server (the Peripheral device) can request for data or simply send information to the counterpart with or without an explicit signal from the latter.
In general, notifications are used to inform the client about the value assumed by a characteristic. For this reason, they are one of the possible values that can be assigned to the properties of a characteristic, together with the already mentioned Read and Write.
In order for the mechanism to work, an explicit request to receive notifications from the client is required.
To better clarify these concepts, consider that one of the characteristics defined by the manufacturers of the radiator valves EQ3 Eqiva has the following specifications:
- UUID: d0e8434d-cd29-0996-af41-6c90f4e0eb2a
- Property: read/write/notify
The 128-bit UUID allows us to understand that the characteristic has been defined by the producers and its properties tell us what operations we can perform on it.
| [1] | Bluetooth Core Specification 5.0, Volume 1, Part A, Section 1.2 |
| [2] | Bluetooth Core Specification 5.0, Volume 1, Part A, Section 6.2 |
| [3] | Bluetooth Core Specification 5.0, Volume 3, Part C, Page 1966 |
| [4] | Bluetooth Specifications - GATT Overview |
| [5] | (1, 2) Kevin Townsend. Introduction to bluetooth low energy. A basic overview of key concepts for BLE. |
2.2. BT/BLE: Main Differences
This section is not essential to understand the rest of this guide, but it is still useful to better figure out what is detected through the logging activity.
The next paragraphs explain the main differences between the classic Bluetooth implementation (Bluetooth BR/EDR) and the Bluetooth Low Energy. The goal is to deepen some details related to aspects of connection and consumption. Receiving and transmitting data requires a lot of energy and consequently interesting solutions have been studied to optimize these activities for some use cases.
Important aspects of Bluetooth BR/EDR [15]:
- transmits all types of data (including audio/video streams), ensuring high throughput
- requires pairing
- allows the use of different topologies (Piconet and Scatternet)
Important aspects of Bluetooth Low Energy [15]:
- asynchronous data exchanges, with low throughput (no streams)
- optional pairing
- basically uses Piconet topology
- low consumption: allows to power devices with coin cell batteries and still last over time
Just above the physical layer, which we will not cover, there are two very different Data Link layers. Both define a series of states in which a single device can be. The next image immediately highlights how Bluetooth BR/EDR devices are more complex.
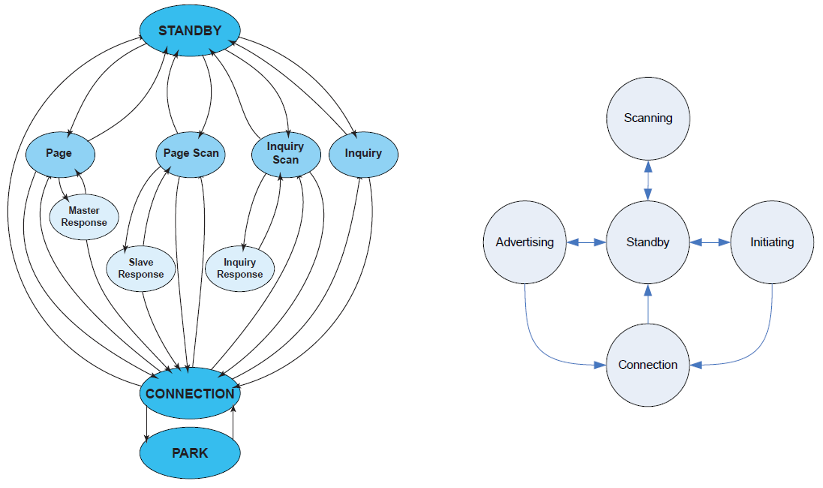
Observing the Connection states in the two state machines, we can see the connection oriented nature of
the Bluetooth BR/EDR. Once the connection is established, the slave device can reduce its consumption by exploiting
some substates (Sniff or Hold mode) or by entering in Park mode (see BR/EDR Connected Slave Substates).
These alternatives keep the connection to the master device active, although Park Mode hides the device from the network.
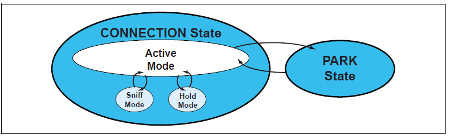
Bluetooth BR/EDR Connected Slave Substates [12]
In the case of BLE, the only way to save energy is to enter the Standby state. This however leads the device to
lose the connection and restart the Advertising or Initiating phases (respectively for Master and Slave),
creating a continuous sequence of standby-search-connection phases. The reason why repeating this “steps” allows
you to consume few energy and maintain low response times lies in various factors.
First of all, BLE technology uses only 3 physical search channels (BR/EDR uses 32 channels). Given the time
required for packet transfer, this phase requires between 0.6ms and 1.2ms (while 22.5ms in BR/EDR). This
leads to a power saving of 10-20 times compared to the classic Bluetooth [14] .
Note
Given these different “architectures”:
- using Bluetooth BR/EDR a master can connect with up to 7 slaves in active mode and 255 in park mode
- using BLE there are no theoretical limitations on the number of slaves to which a master can be connected
Still within the Data Link level, substantial differences are present in the transmission of packets:
- In Bluetooth BR/EDR each communication channel is divided into slots of 625us used alternately by the master and the slave. They can transmit a packet per slot. However, sending a package can take up to 5 slots.
- In BLE the time units are Events. They vary in length depending on the decisions of the master (for connection events) and the advertiser (for advertising events).
While the Bluetooth BR/EDR uses a very strict transmission method, the one used by BLE is more flexible and can be optimized according to various parameters.
As an example, for Connections Events, the BLE specification provides a connInterval [16] value which indicates
the minimum time that must elapse between two consecutive events of this type (between 7.5ms and 4s).
Another parameter, connSlaveLatency [16], defines the number of Connection Events in which the slave is not forced
to listen to the master and can stay in standby. This parameters are responsible for consumption and latency times
and exist also for the Advertising Events.
By increasing connSlaveLatency and keeping connInterval low, you can guarantee excellent consumption
without lengthening latency times too much.
As already mentioned, the BR/EDR standard is designed to transmit any type of information, while the BLE prefers a few data at a time. The result is that in the first case several types of logical transport are defined: SCO and eSCO for synchronous communication, ACL for the asynchronous one and two types of Broadcast. The BLE alternative instead implements only asynchronous ACL communication.
This leads to a big difference in package format. As the next image shows, BLE packages are shorter (max 376 bit vs 2871 bit) and therefore require less transmission time. This was achieved by removing redundant information and limiting the payload size.
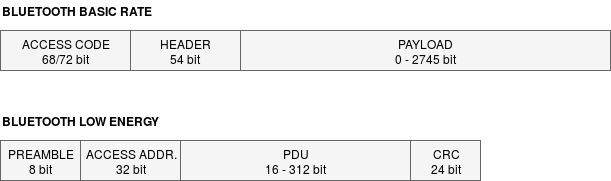
Bluetooth BR and BLE packet format
By taking advantage of all these design choices, BLE can complete a connection (scan for devices, link, send data, authenticate,
and go back to a standby state) in just 3ms. The same activity with Bluetooth BR/EDR takes hundreds of milliseconds [14].
Reduced times lead to lower energy consumption and lower latency.
| [12] | (1, 2) Confronto Tra Bluetooth Basic Rate e Bluetooth Low Energy |
| [13] | How BLE works |
| [14] | (1, 2) One Small Step For Bluetooth Low Energy Technology |
| [15] | (1, 2) Ten Important Differences Between Bluetooth BREDR And Bluetooth Smart |
| [16] | (1, 2) Bluetooth Core Specification 5.0, Volume 6, Part B, Page 2638 |
2.3. Logging Via Android
Logging is the activity of recording data and information related to certain operations as they are carried out. In this specific case it is a matter of tracing all the Bluetooth packages exchanged during the communication between a BLE device and a smartphone in order to inspect their contents.
From version 4.4 “KitKat”, Android introduces the possibility to perform the logging of the packets sent and received via Bluetooth through the function “Enable HCI Bluetooth snoop log” in the “Developer Options” section.
Note
If there is no “Developer Options” entry in the settings (see Android settings), you can activate it by entering the “About Phone” section and clicking repeatedly (at least 8 times) on Build Number or Version Number (depending on the version of Android) up to the appearance of a notification.
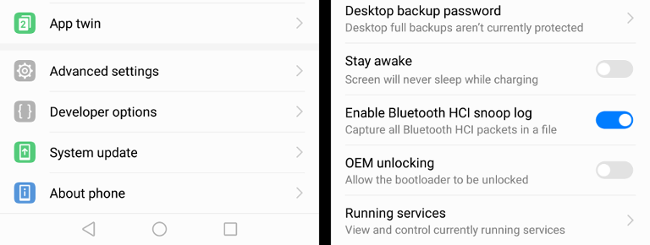
Android settings
Once activated, the system starts to populate a file called bootsnoop_hci.log, which is usally placed inside the
root directory of the smartphone (something like /sdcard/). The format is compatible with many protocol-analysis
software.
Note
Unexpectedly, the acquisition of Bluetooth packages via Android does not require the smartphone to
be rooted. Despite this, some manufacturers (e.g. Huawei) by default save the bootsnoop_hci.log file in a
non-accessible directory or disable its generation. If you cannot find the log file, you’re probably in one of this
cases. It’s therefore necessary to root the smartphone. Once that is done, within the Android system folders you can
find a bt_stack.conf file (in my case in /system/vendor/etc/bluetooth/). Inside this file you can activate
the generation of the log file and choose where to save it by appropriately modifying the following lines:
BtSnoopLogOutput=true
BtSnoopFileName=/data/log/bt/btsnoop_hci.log
The inspection software chosen is Wireshark, a free and opensource network protocol analyzer. However, the analysis is not immediate because by default all the packages involved in the communication are displayed. These include each level of the Bluetooth specification.
As previously seen, the management of services and characteristics is one of the tasks of the
Generic Attribute Profile, which exploits the ATT protocol. Wireshark identifies it through
the CID 0x0004. Therefore, it is possible to remove unwanted packages from the list and
keep only the important ones by inserting the expression btl2cap.cid == 0x0004 into the filter
bar (the bar below the buttons on top of the window).
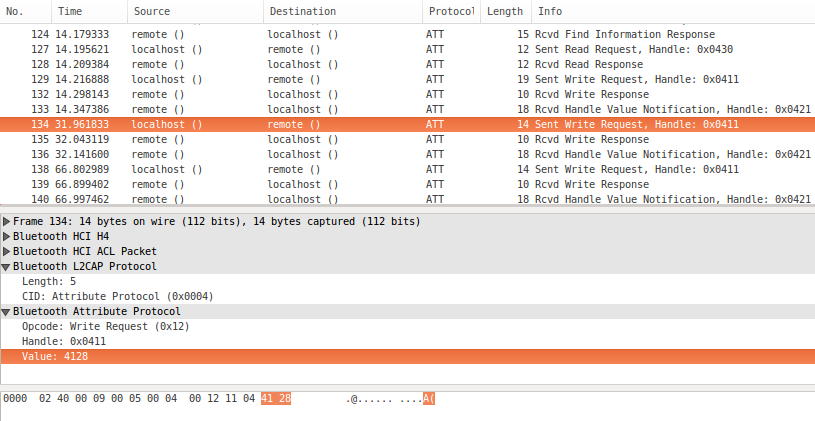
Wireshark log example
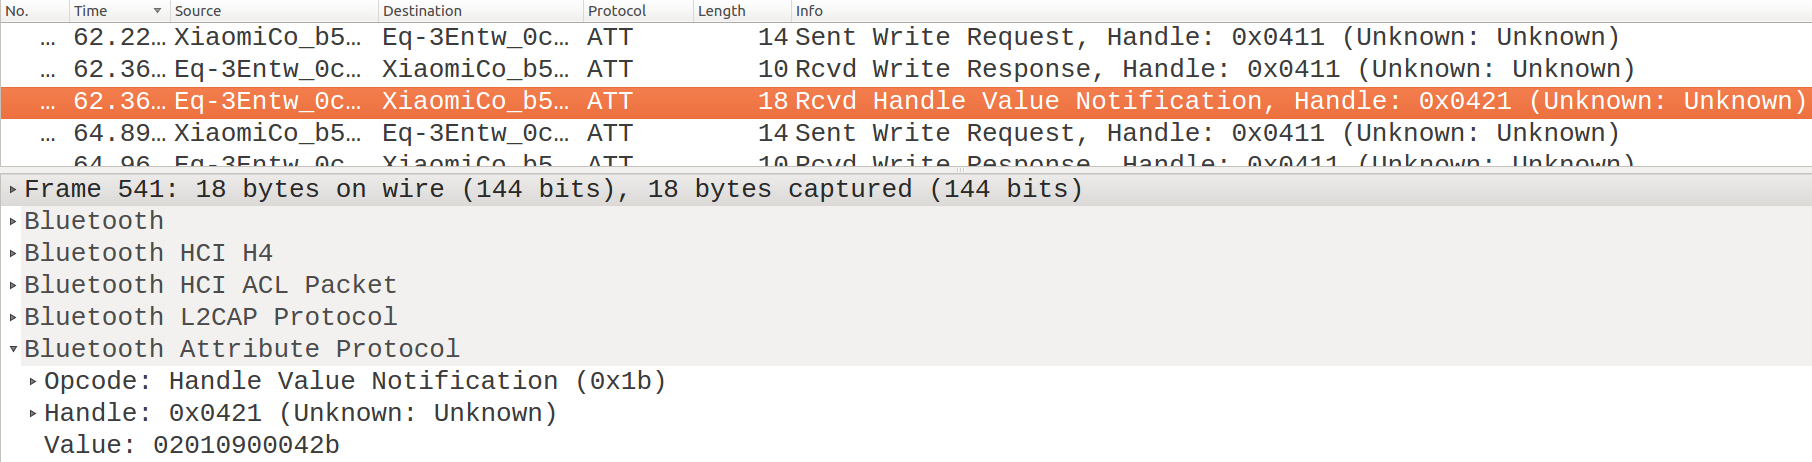
Once this is done, it becomes immediate to observe what are the characteristics on which a writing operation has been carried out, the written values and the content of the notifications received.
Let’s take the previous image as a reference (see Wireshark log example). It shows an example of logging file generated by Android. The upper half of the image shows a list of all the exchanged packages (already filtered by ATT protocol) in time order. Each entry reveals the source, the destination and a brief description of the packet’s content.
By selecting a package and expanding the Bluetooth Attribute Protocol section (as in the lower half of the image), all the details appear:
- the type of operation performed (read/write/notify)
- the characteristic on which it was carried out (identified by a 16-bit Handle)
- the transmitted data
The reason why the characteristic is identified by a Handle instead of the aforementioned UUID is that the ATT protocol considers characteristics, services and profiles as attributes. Each attribute is recognized through a handle.
Starting from the concepts described so far, the work of reverse engineering becomes applicable using various methodologies and considerations. In addition to identifying the written and read characteristics, the goal is to decipher the meaning of the transmitted data, which represent the proprietary communication protocol designed by the manufacturer. It is important to note that, depending on which is the target BLE device, there are operations that require data entry by the user to be performed (e.g. “set temperature to XX degrees”) and others that do not require external data (e.g. “turn off the valve “).
2.3.1. Operations requiring external data
These are operations for which the user must specify some details (i.e. parameters) so that they can be performed. In the programming world, this coincides with the invocation of a function that requires parameters: the function name remains the same, while the parameter(s) varies depending on the user’s choice.
The value sent to the BLE device can therefore be divided into two sections:
- a common pattern, representing the operative code of the instruction
- a variable part based on the information supplied by the user
NOTE: It is quite common that the variable part is somehow coded according to the choices of the producer instead of keeping “raw” values
The idea is to group in a single log file the execution/invocation of several operations that have the same operative code and for each of them to change the parameter. This technique makes it possible to identify the common pattern and, in the simplest cases, allows to understand the method used to calculate the variable part. In cases where it is not trivial to understand how the variable part has been encoded, the decompilation of the Android application becomes essential. This will be discussed later.
Example
This example refers to the radiator valves discussed in the Introduction and assumes to have already connected the BLE device to the central device and activated the packet sniffing.

Commands to set 18, 20 and 21.5 degrees
Following the idea described in the previous paragraph, we set the temperature consecutively at 18°C, 20°C and
21.5°C. By analyzing the log file via Wireshark (see previous image) is now possible
to observe that the values were written on the handle 0x0411 and their values was respectively
0x4124, 0x4128 and 0x412B.
It is easy to notice that byte 0x41 appears in all three cases. It is therefore reasonable to suppose that
it identifies the type of operation to be performed (i.e. it’s the operative code). Consequently, the
remaining byte will represent and encoding of the temperature we selected each time.
By converting the hexadecimal bytes 0x24, 0x28 e 0x2B to base 10, we obtain 36, 40 and 43.
These correspond to twice the initial values (which were 18, 20, 21.5). It is therefore clear that the
coding used consists in multiplying the desired temperature by two.
By using this information we deduced that:
- to send the “change temperature” command we have to write on the handle
0x0411 - the value to be written is composed of
0x41concatenated to twice the temperature we want to set
2.3.2. Operations not requiring external data
These are operations whose execution requires no external data. It’s therefore reasonable to expect that the value sent to the valve to cause its activation consists only of an invariant operating code.
In these cases, the goal is to create log files that represent the execution of a single instruction, in order to identify immediately what has been transmitted to the BLE peripheral. It is important, however, to perform the same operation starting from different conditions in order to verify the effective invariability of the operating code in all the “states” in which the device can be. For this purpose, the decompilation of the Android application can provide support.
Example
This example refers to the radiator valves discussed in the Introduction and assumes to have already connected the BLE device to the central device.
Before starting the packet sniffing, we put the valve in automatic mode. Then we activate the packet
sniffing and through the application we set the “boost mode”. By analyzing the log file via Wireshark is
now possible to observe that, once again, the command was sent to the handle 0x0411 and the written
value is 0x4501.
We repeat the same procedure twice more. The first time with the valve in “manual mode” and the second
time in “holiday mode”. By looking at the log files, we note that the values sent and the handle remain
the same. This allows to conclude that the two bytes 0x4501 are the invariant operating code of the
“start boost mode” instruction taken into account, regardless of the starting state in which the radiator
valve can be (automatic, manual or holiday mode).
2.3.3. Notifications
Notifications are sent from the BLE device to the central device following the execution of each command.
It is not necessary to apply a specific method to detect them because they are already present in the
log files created previously. Wireshark reports the presence of notifications through the description
“Rcvd Handle Value Notification, Handle: 0xYYYY” in the “Info” column (see Wireshark log example).
The structure (the carried value) of the notifications can be very variable and unpredictable, also because they could be sent to the central device at any time. They could contain a lot of information or indicate only a confirmation of correct execution. In general, as with operations with parameters , notifications are often composed of:
- common patterns which allow splitting notifications into groups/types
- variable values that provide detailed information coded according to criteria chosen by the manufacturer
Example
This example refers to the radiator valves discussed in the Introduction.
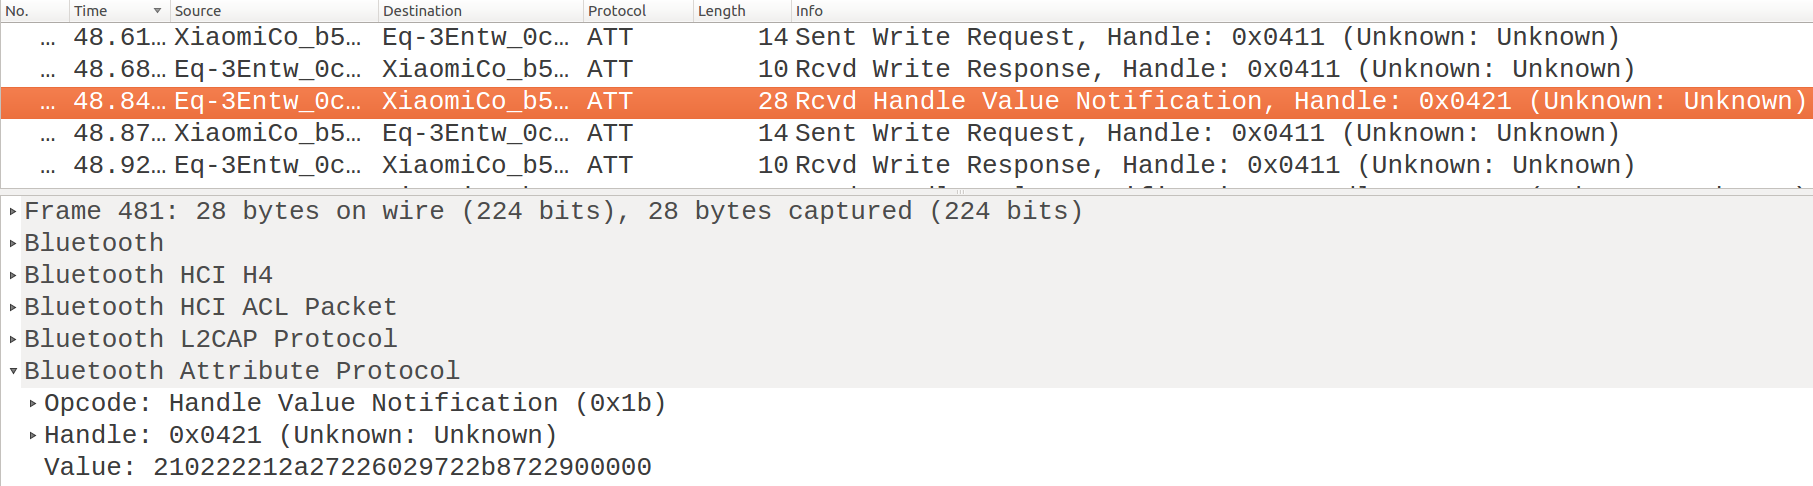
Notif. after a “Daily Profile Request”
Notif. after “Manual Mode” command
We perform different types of operations and then look at the log files with Wireshark. By inspecting the package list, it is easy to see that the radiator valve always sends at least one notification at the end of each operation. Notifications are identified by packages called “Rcvd Handle Value Notification, Handle: 0x0421” (see Notif. after a “Daily Profile Request” and Notif. after “Manual Mode” command). The values contained will often be very different, both in terms of content and length (number of byte sent).
The process followed to understand the meaning of the received values is equivalent to that reported in the section Operations requiring external data. It is therefore necessary to group the notifications received as a result of the same command in the same log file and observe the differences.
The result of this activity highlights a large subdivision carried out by the most significant bytes:
0x0202[..] and 0x21[..] indicate notifications relating to the writing and the request of a daily profile,
while 0x0201[..] identifies those resulting from the execution of any other operation. Even in this case the
decompilation of the Android application becomes useful to better understand the syntax. This will be
discussed in the next section.
NOTE: the value of the handle is always the same and identifies the characteristic on which notifications are sent.
2.3.4. Data Sent Through Advertising Packets
As already mentioned in section BT/BLE: Main Differences, the Bluetooth Low Energy standard allows an exchange of data to be performed without a pairing procedure. Basically, in these cases, the BLE device sends data in broadcast to central devices without using notifications. This is done by taking advantage of the Advertising packages.
The structure of this type of package is described in the Bluetooth specifications [17]. Being another protocol, it is different (and more complex) from the structure of the ATT packages seen previously: the OpCode, Handle and Value fields are no longer present.
Note
We have previously shown how to filter in Wireshark only the packets related
to the ATT protocol. However, the Advertising packages are related to the HCI protocol. You can therefore
keep only these packages by writing bthci_evt into the filter bar (the bar below the buttons on top of
the window).
We do not need to know the structure of the advertising packages in detail, but it is important to know that:
- a Address field contains the address of the device that is doing advertising
- a Data field contains the data we are interested in, formatted as:
length: number of bytes of AD type + AD dataAD type: Identifies the type of data present in AD Data. The possible data types and their related meanings are defined in the “Bluetooth Core Specification Supplement” [18]AD data: Payload. Its length depends on the AD Type field
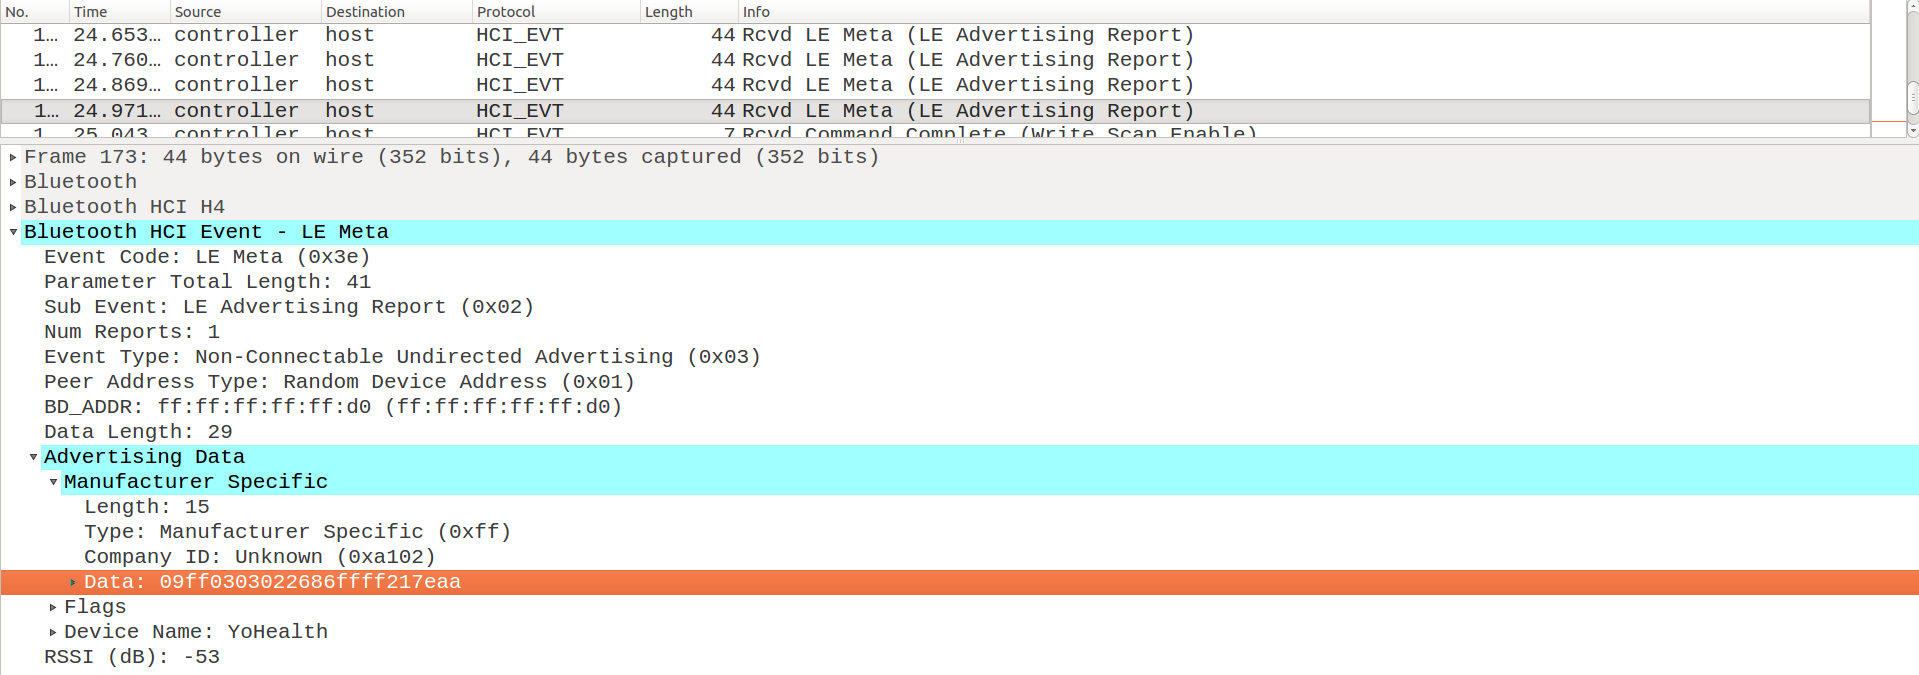
Wireshark log of Advertisement packets
Wireshark identifies advertising packages through the description “Rcvd LE Meta (LE Advertising Report)” in the “Info” column. The previous image shows the presence of all the described fields, albeit with slightly different names.
The Address field is called BD_ADDR, while the Data field we are interested in is the one shown under the
Advertising Data > Manufacturer Specific section. According to the specifications [18], “Manufacturer Specific” is
an AD type represented by the code 0xFF and must be at least 2 Bytes long.
As for notifications, the contents (the carried value) of advertising packets can be very variable.
Also in this case, the Data field will probably be composed of a common pattern and a variable part.
The latter contains the information we are looking for, coded according to some criteria chosen by the manufacturer.
The idea is always the same: to generate more log files and, for each one, to provide different input to the advertising
device. For example, if the device is a BLE scale, use objects/people with different weights. Then look at the changes in
the Data field. These changes are related to the inputs I have provided to the device and therefore are useful to
understand their meaning.
Example
This example refers to the BLE scale discussed in the Laica PS7200L Protocol section.
Activate Bluetooth and packet sniffing on your Android device. Weigh a person using the application supplied with the scale. Once the log file is obtained, repeat the same procedure with another person or an object of different weight.

Log with two different weights (76kg left, 77.6kg right)
We look at the values contained in the Advertising Data > Manufacturer Specific > Data field in the Advertising
packages (see image above). We compare them:
09 ff 02 f8 02 47 86 ff ff 21 93 aa
09 ff 03 08 02 81 86 ff ff 21 de aa
A good part of the data transmitted remains constant and only a few bytes change (the second, the third and the second to last). We have thus understood where to look for the data that interests us (in the variable part).
For instance, in this case it is rather easy to notice that the first two bytes (of the variable part) concatenated return the weight of the person multiplied by 10, as:
02 F8in decimal base corresponds to760(76.0 if divided by 10)03 08in decimal base corresponds to776(77.6 if divided by 10)
In conclusion, applying what has just been described to all the functionalities of a BLE device allows to identify a good part of the communication protocol. Probably some details related to the variable data within the various commands remain hidden. The next section discusses how to fill these gaps and confirm what has been deduced through the analysis of the application code.
| [17] | Bluetooth Core Specification 5.0, Volume 2, Part E, Page 1193 |
| [18] | (1, 2) Bluetooth Core Specification Supplement, Part A |
2.4. Android Application Analysis
This section wants to give a guideline and provide some reference examples about: * which services to use to decompile an Android application * how to analyze the aspects of communication and data transmission via Bluetooth
The fact that there is no common standard to follow in the creation of Android applications makes it difficult to generalize the code and the analysis.
In general, to get the source code you need the APK package of the application, which is basically an archive that contains all the data that Android needs to manage the installation of the app. Once in possession of the APK file, there are decompilers (typically for Java code, on which Android is based) that in a short time generate an archive containing the original code. The product code is automatically identified as “Android project” by Android Studio, which is the official open source IDE for the development of Android applications. This ensures ease of reading and analysis, taking advantage of the advanced development features provided by the software.
2.4.1. Get The APK Package
Option 1: through a web service
A fairly simple way to perform this step is to rely on a web service to extract from the Google Play Store the APK package of the application used by the BLE device. The APKPure site is the only one on which we have found our reference application, but there are also other sites that provide the same service, such as App Apk and APKSFree.
If none of these sites leads to a result, it is often possible to obtain the APK package through the procedures described in the next section.
Option 2: through a File Manager app
Also the File Manager applications often allow to extract the APK packages from the applications on the device. We mention this option as “second possibility” because in the medium case these applications require a lot of permissions to operate (e.g. read storage, read phone status). We report the procedure to be performed with two different applications:
ES File Manager (release 4.1.8.1)
- from the application’s main page (called “Home”), select “APP”
- identify the application for which you want to get the apk
- press and hold the icon, then click on “backup”
- the app tells you where the apk file is saved (in our case
/sdcard/backups/apps)
Astro File Manager (release 6.4.0)
- from the application’s main page (called “File Manager”), select “Go To App Manager”
- identify your application, hold the icon and select “backup” from the drop-down menu
- an apk file is created and it can be accessed from the file manager itself
(it does not say where it is saved; in our case in
/sdcard/backups/apps)
As you can see, the procedures are very similar and also on other applications will not be very different. Note that probably the well-known Titanium Backup allows you to do this. We did not consider it for simplicity, as it requires the device to be rooted.
Option 3: through ADB (manual method)
Assuming you have the application installed on your smartphone, you can get the APK package through adb
(Android Debug Bridge), which is a command-line tool that allows you to control an Android smartphone via USB.
The adb tool can be installed through the android-adb-tools package, available in the Debian repositories.
Note
adb requires USB debugging to be enabled. This function can be found in the “Developer Options” section.
(refer to this note if there is no “Developer Options” entry in the settings of
your smartphone)
Once installed adb and connected the device via USB, use the following commands:
$ adb shell pm list packages          #find the package name of the app
$ adb shell pm path package-name      #find the address of the app
$ adb pull app-address                #copy the apk
Depending on the Android version used, the following error may be returned:
remote object "app-address" does not exists
In this case, you need to move the apk file to an accessible folder before downloading it. Use the following commands:
$ adb shell cp app-address /storage/emulated/0/Download
$ adb pull /storage/emulated/0/Download/base.apk
The apk file base.apk should now be in your home and contains the necessary to get the Java code.
2.4.2. Obtain the source code
Using the APK file we now want to extract the Java code that makes up the application. Before proceeding it is good to know that there are cases in which the code will be obfuscated. Code obfuscation is a practice that consists in making the code more complicated without changing its functionality in order to make it more difficult to understand. This is done to avoid reverse engineering practices.
There are some open source Java de-obfuscators, such as Java Deobfuscator (and his GUI) or Enigma. They require a Jar file as an input, which can be obtained from the APK by following the first two points of this section. However, their use will not be covered in this guide.
Option 1: through a web service
As before, we can delegate the work to web services and more than one site can be useful.
Among the sites tested, Java Decompilers is the one that provided the
clearest code: probably the most similar to the real one (variable names are reasonable and there are no GOTO
statements). ApkDecompilers produces the same result, but puts all the
files in a single directory. Since Android applications include a lot of files, it is less comfortable.
Option 2: through dex2jar and JD-GUI (manual method)
Dex2jar and JD-GUI are two programs that respectively allow to transform the apk file into a Jar (Java Archive) and decompile it by following these steps:
Download the latest release of dex2jar from this page
The file to be downloaded is called
dex-tools-X.X.zip, where X.X indicates the version number (2.0, at the time of writing)Execute these commands in a terminal:
$ unzip dex-tools-X.X.zip
$ cd dex2jar-X.X
$ chmod u+x *.sh
$ ./d2j-dex2jar.sh /path/to/application.apk    #the application APK
This produces a jar file in the
dex-tools-X.Xdirectory.Download and install JD-GUI (released under the GPLv3 license)
Open JD-GUI and select
File > Open Filein order to open the jar archive produced with dex2jar.Select
File > Save All Sources. This produces a zip archive containing all the Java files.
JD-GUI has the advantage of clearly showing the Java packages that make up the project. However, individual files are less clear than those produced with the service discussed in the Option 1.
Other decompilers can be used instead of JD-GUI. One of this is CFR, which is not open source but it also decompiles modern Java 9 features. Other good solutions are Fernflower and the one included in the Procyon suite.
2.4.3. Import In Android Studio
Regardless of the method chosen, the files obtained can be imported into Android Studio to be analyzed. Both Option 1 and Option 2 produce a zip file.
Note
Obviously, you can use any text editor to analyze the produced files. This guide focuses on Android Studio as it’s an open source tool and now a standard in creating Android applications. Whatever the choice, we strongly suggest the use of an IDE that integrates well with Java. (e.g Eclipse, NetBeans).
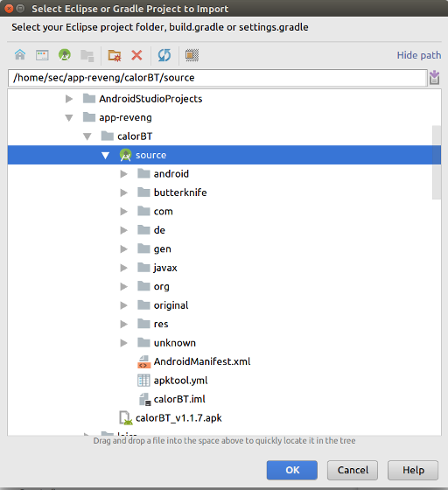
Android Studio - Import Project
Once extracted the zip file, open Android Studio and follow these steps:
File > New > Import Project- Select the directory in which the archive was extracted (the one in which the XML Manifest file is present) and
click
Next(see Android Studio - Import Project). Create project from existing sources > Next- Choose a name for the project and the directory in which to save it (personal choices). Then click
Next. - All the default settings should be fine, so keep clicking
Next.
After that, a panel on the left allows you to navigate between packages and files, while the right side shows an editor enabled for grammatical (and syntactic) correction.
2.4.4. What to look for in the code
In general, a good way to avoid having to consult all the files in the project is to proceed by keywords
and use a search tool. In android studio this tool is provided in the Edit > Find > Find In Path menu.
For example, the next image shows all the files containing the search
keyword OnLeScan.
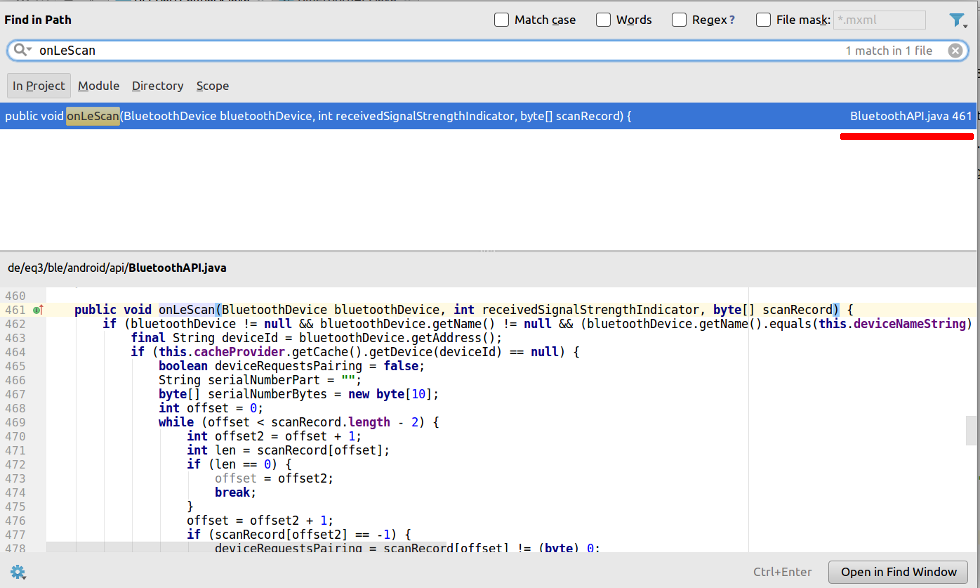
Android Studio “Find in path” window
Within the reverse engineering activity there is little interest in understanding how the connection to the target BLE device works. We can therefore ignore the details of the bluetooth connection to focus on two things:
- identify the files that create the strings that will be sent to the peripheral (made of hexadecimal values), to see how they are composed
- identify the files that manage received notifications to understand how they are interpreted
If you want to find Java classes that deals with the act of Bluetooth connection, you can identify useful keywords
(such as BluetoothAdapter, startLeScan, LeScanCallback, BluetoothGatt) by referring to the
Android BLE API page.
Commands
Finding the classes and methods that deal with composing commands (i.e. strings of values) is not straightforward. This is because every manufacturer can act without constraints when he implements his own proprietary coding. It is not even necessary for these classes to contain keywords related to Bluetooth, as they could be treated separately.
In the best case, the application will contain Java packages with names like command, sendCommand, or something similar and this facilitates the search. Otherwise, the criterion to be used, consists of:
- to use as search keywords the name of the methods that Android uses to write BLE characteristcs
- starting from the results found, go back to the classes used for the generation of commands
Specifically, Android within the BluetoothGatt
class provides the writeCharacteristic method. Note that the values we are interested in are those that must be written
on the characteristics. To set a value before writing it, the
BluetoothGattCharacteristic
class provides the setValue method.
As a result, command, writeCharacteristic and BluetoothGattCharacteristic are examples of good search keys.
Notifications
Notification management can also be done in various ways depending on the choices of the producers. However, as for commands, at some point the application must definitely use the default methods provided by Android to manage the reception.
Hypothetically, once received and extracted the content of the notification, this is sent to a sort of parser that interprets it and then performs other tasks depending on its meaning. This parser is what we are interested in.
To easily identify files that contain useful code, it is important to know that:
- the receipt of notifications by a feature must be explicitly enabled, using the
setCharacteristicNotificationmethod of the BluetoothGatt class - the callback function called when a notification is received is
onCharacteristicChanged, provided by the BluetoothGattCallback class
This callback function will be the starting point to go back to the pieces of code that actually interpret the content of the notifications.
In conclusion, good search keys are: setCharacteristicNotification,
onCharacteristicChanged and BluetoothGattCallback.
2.4.5. Create A Class Diagram
It is often useful to have a Class Diagram [6] available for the whole project or just for small parts. This allows you to schematically represent the application and highlight the dependencies between the classes that compose it.
Manually creating a Class Diagram for an Android application can result in a lot of work, so some automated tools will help us. There are several Class Diagram generators for Java/Android code, but we will explain how to install and use Code Iris because:
- integrates easily into Android Studio
- allows to filter and highlight classes and packages (useful for big projects)
- it is quite frequently updated
- allows to export data in Json format
Note
Code Iris is not open source. However, after trying different free alternatives, our opinion is that it is the easiest and most complete solution. If you want to stick with free software, skip to this paragraph.
A few steps are required to install Code Iris:
- open Android Studio and select
File > Settings > Plugins - click on
Browse Repositorieson the bottom of the window - search for
code irisand click on the green “”Install”” button - restart Android Studio
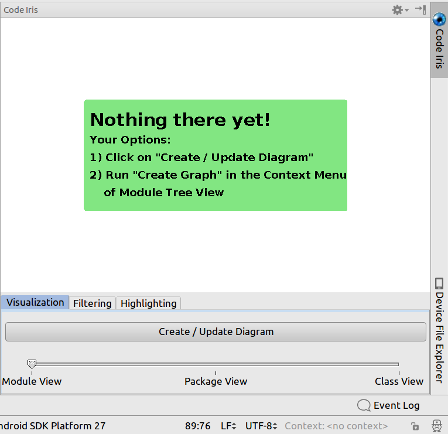
Code Iris First Start
Once you restart Android Studio and open a project, you can start Code Iris through the corresponding tab at the top right of the window. The first time you need to create the Class Diagram via the “Create/Update Diagram” button (see Code Iris First Start).
The operation takes a few moments, but produces a Class Diagram related to the whole project. The result can be inspected via three different “views”:
- Module View: the most abstract view, generally not very useful for our purpose
- Package View: maintains the subdivision into packages and also shows the classes they contain
- Class View: shows all classes without the subdivision into packages
The Package View and the Class View are both useful, depending on personal needs. The large size of Android projects, however, requires the ability to “cut” parts of the Class Diagram, so that it becomes easy to read.
Code Iris provides filtering tools according to class name and/or package name. This allows us to identify useful parts of the Class Diagram. Once this is done, moving the cursor on the names of the individual classes highlights all their dependencies (see Class View with Filtering Enabled).
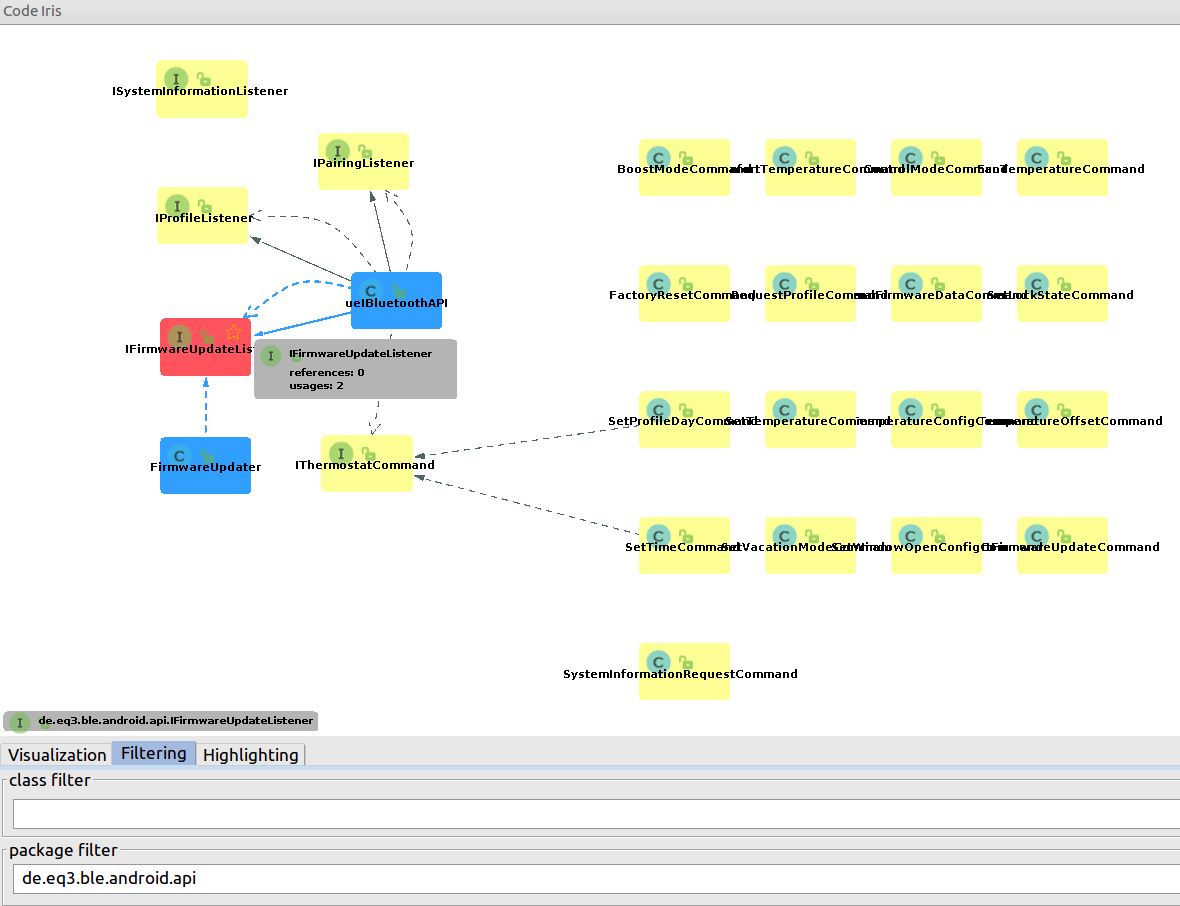
Class View with Filtering Enabled
NOTE: the version of Code Iris in the Android Studio repositories is from 2014. More recent versions (updated to 2018) can be
easily installed by downloading the package from the JetBrains site
and through the “Install Plugin From Disk” option in File > Settings > Plugins (inside Android Studio).
A free and open source alternative
Among the open source alternatives there are many software that can generate class diagrams [8] [9] [10] [11]. However, they often present problems such as:
- Request to manually add each class to the diagram. It does not make much sense because we don’t know how the application is composed. It’s more important to be able to add individual packages.
- Request to manually select each Java source directory. Not ideal, given the size of Android projects.
- Very confusing graphic interface.
An acceptable solution involves the use of NetBeans IDE, which is a Java IDE [7] , and the EasyUML plugin. Since NetBeans is already present in the Debian repositories, you can install it with apt:
$ sudo apt install netbeans
EasyUML requires you to download the correct package, which depends on the NetBeans version, from
this page. To install it you need to extract the files
from the downloaded zip archive, open NetBeans, select Tools > Plugins > Downloaded > Add Plugins and choose
all the .nbm files from the extracted folder.
Once the software is working, both a Java project and a UML project must be created in order to obtain a Class Diagram. The following is a step by step guide:
- Create a Java project from existing sources:
New > Project > Java > Java project with existing sources > Next- set the name of the project and when asked for “Source Package Folders” select the directory in which the APK’ source code have been extracted
- if the message “The specified package folder contains compiled class files” appears, click on Ignore
- Create an UML project:
New > Project > UML > UML Diagrams Project > Next
- Now the left panel shows the Java packages. Right click on the package you want to create the Class Diagram. and choose “easyUML Create Class Diagram”.
- Choose the easyUML project created before and click on “Create Class Diagram”
The generated Class Diagram contains by default more information (methods and members) than the one shown in the previous section. This makes it more detailed, but messy and often unclear.
To keep only the names of the classes (and their relationships) make a right click on the diagram and remove the check from “Show Members” under “Visual Options”. The following image shows the obtained diagram. For comparison purposes, the code part shown in the diagram is equivalent to the one shown in figure Class View with Filtering Enabled.
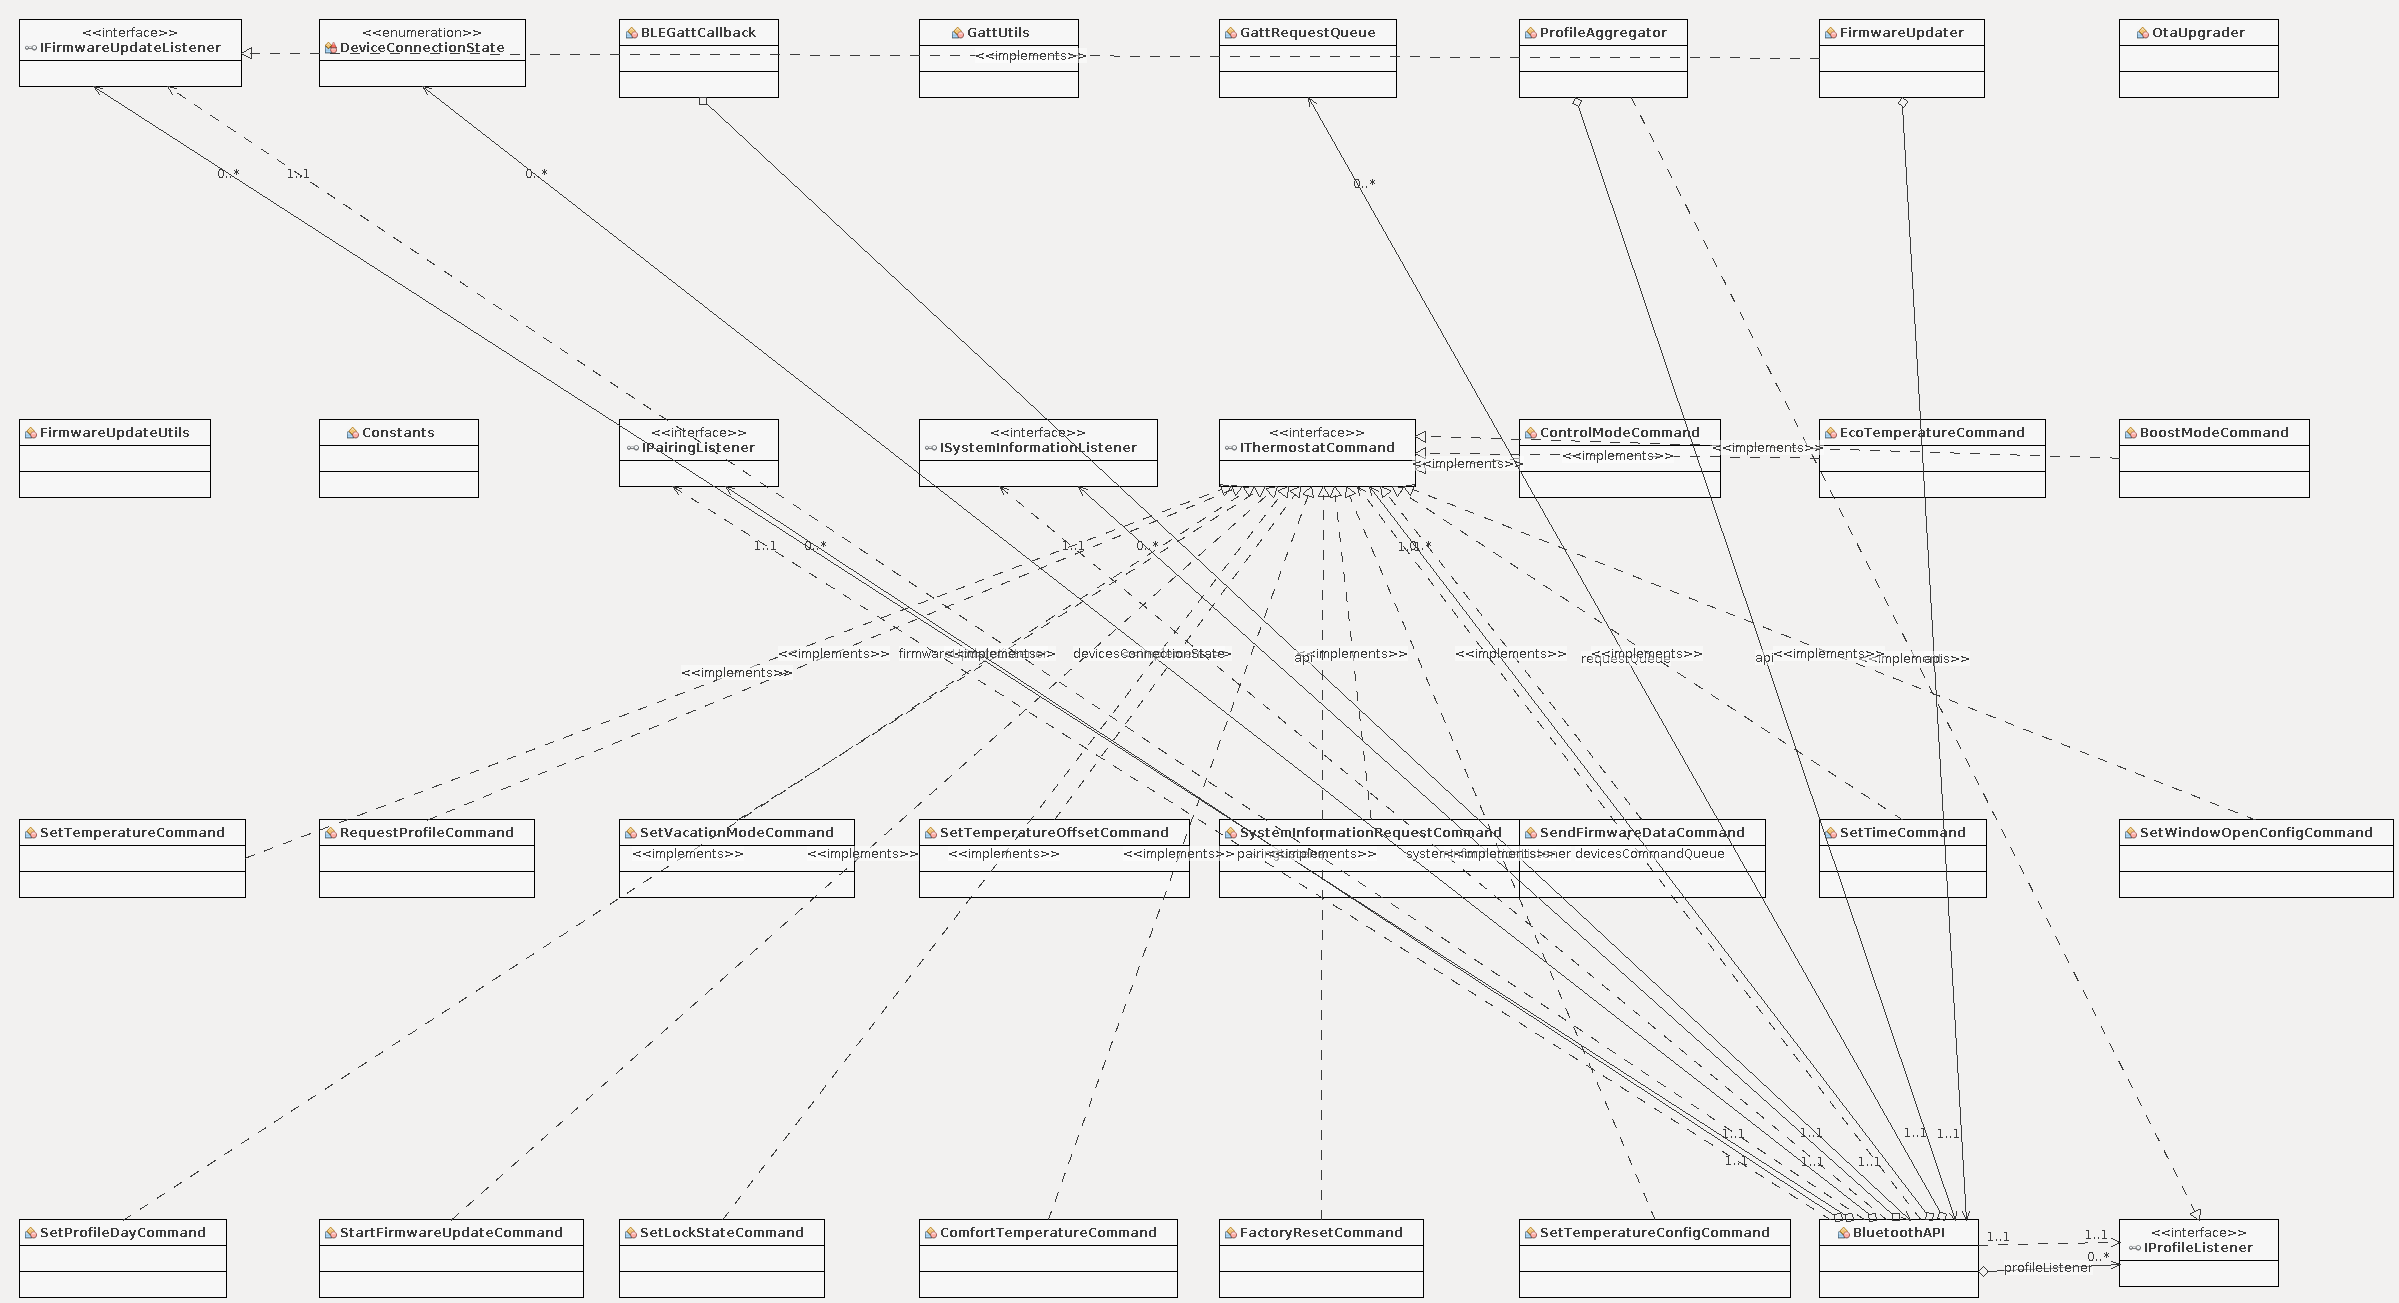
Netbeans And EasyUML - Class Diagram
2.4.6. Example Application Analysis
The examples shown will temporarily refer to the CalorBT application, supplied with the radiator valves discussed in the introduction. They will be subsequently extended to other devices as soon as they are tested.
The CalorBT application, developed by eQ-3, is available for Android 4.4+ and iOS 8.3+ platforms. The analyzed version is the 1.1.7 updated to the month of January 2016 (currently the last available), for which the source code was obtained using the APKPure and JavaDecompilers web services, as described in the previous sections (see Get The APK Package and Obtain the source code).
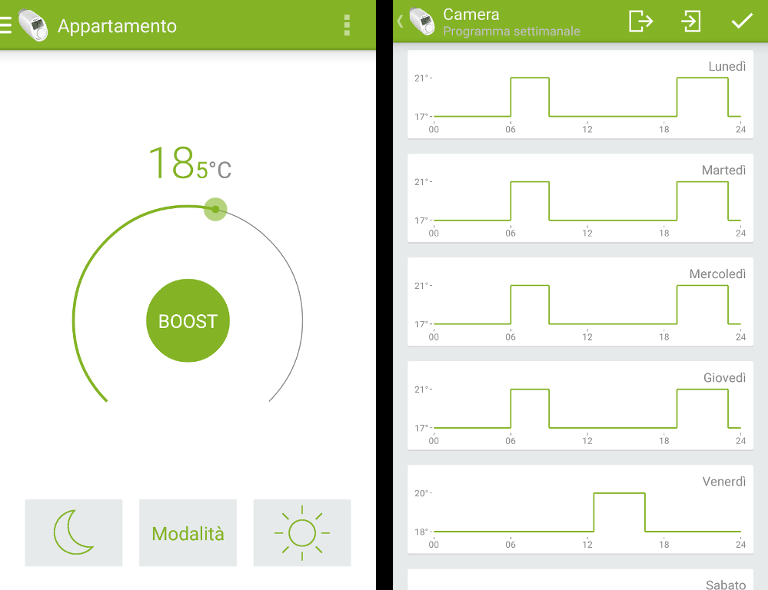
Main Activity (left) and Weekly Schedule (right)
The application is quite simple and the initialization phase only requires to pair the central device with the desired radiator valves through a simple pairing procedure. It is interesting to note that it’s allowed to communicate with only one device at a time. Once the connection is made, you are sent to a temperature management activity (see Main Activity), from which you can access all the other features.
Once the project has been imported into Android Studio, it’s immediately obvious that the source code is free of obfuscation. The files are completely readable and mutually consistent. Furthermore, the decompiler maintained the package subdivision of the entire application.
This is good news, it suggests that the manufacturer has not tried to prevent reverse engineering works. Nevertheless, the analysis is not immediate: excluding external libraries (such as ButterKnife and FasterXML) the application consists of 1398 files including 144 classes and 16 Java interfaces. Given such a large number of files, it will be necessary to use the search methods discussed in the previous sections.
Commands
Proceeding as described in the previous section, a short search with the keyword command shows the existence of a
series of Java classes that form the code needed to compose the commands (see Search results).
They are contained in the de.eq3.ble.android.api.command package (a Java class for each command).
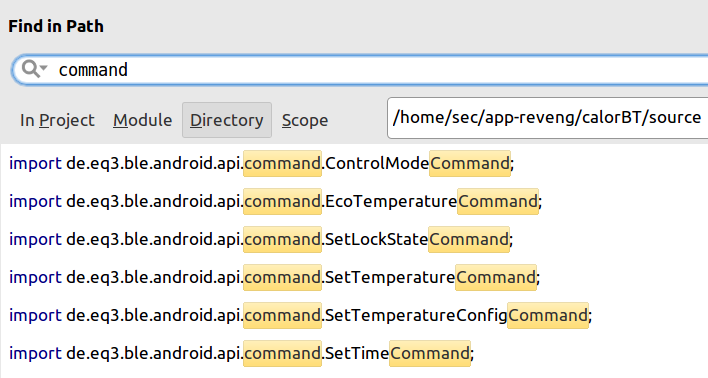
Search results
This type of organization is particularly helpful as it allows to know all the instructions that the application can send to the radiator valve and for each one provides detailed information. Each class has been designed according to the same principle:
- the constructor deals with composing and storing the value corresponding to the instruction in an array
- external activities can request this value through the public method
getCommandData, which is certainly present as required by theIThermostatCommandinterface implemented by each class.
The example seen in the “Operations requiring external data” section refers to the SetTemperatureCommand class shown below.
1 2 3 4 5 6 7 8 9 10 11 12 13 14 15 | public class SetTemperatureCommand implements IThermostatCommand {
private final byte[] commandData;
public SetTemperatureCommand(Number setPointTemperature) {
this.commandData = new byte[2];
this.commandData[0] = (byte) 65;
this.commandData[1] = (byte) ((int)
(setPointTemperature.doubleValue() * 2.0d));
}
public byte[] getCommandData() {
return this.commandData;
}
}
|
In summary, the logging activity had identified:
- the byte
0x41as a common pattern to all instructions of this type - a second byte as a variable part, equivalent to the chosen temperature doubled
Line 6 of the above code shows that the command will consist of 2 bytes, the content of which is shown in lines 7 and 8.
The first always contains the value 65, whose conversion in hexadecimal corresponds precisely to 0x41. The second one,
on the other hand, is variable. It’s based on the setPointTemperature parameter supplied to the class constructor and
reveals the temperature coding already mentioned.
It is interesting to note that line 8 not only provides information on the meaning of the second byte, but also indicates how to calculate it. This is particularly helpful in creating the instructions within the management software discussed later, so that they can be consistent with what is required by the valve.
Notifications
Referring to what was said in the previous section, we look for the function onCharacteristicChanged. This is
located in the file BLEGattCallback.java. Looking at the code, we see that the content of the notification is interpreted by the
updateDeviceState function, whose prototype is:
public void updateDeviceState(String deviceId, byte[] value)
The function is located in the file BluetoothAPI.java and, as for commands, the data are
stored in a byte array (represented by the second argument value).
updateDeviceState recognizes the type of notification by reading the value contained in the first and, in cases of
ambiguity, in the second byte. Based on this, it delegates the correct operations to other methods. This creates a first
subdivision, corresponding to the one mentioned in the logging section. More
detailed information is then obtained by analyzing function calls.
The method adopted is therefore very simple. Assuming, for example, to send a request to read a daily profile to the
radiator valve, the result will consist of a notification whose first byte will correspond to the value 0x21
(i.e. 33, in the decimal system). Within the updateDeviceState function, which will not be reported entirely for
space reasons, this is the part of code involved:
1 2 3 4 5 6 7 8 9 10 11 12 13 14 | int frameType = value[0] & 255; //extract the first byte
..
if (frameType == 33) {
dayOfWeek = ModelUtil.getDayOfWeek(value[1]);
byte[] profileData = new byte[(value.length - 2)];
for (int i = 0; i < profileData.length; i++){
profileData[i] = value[i + 2];
}
this.profileListener.profileDataReceived(dayOfWeek, profileData);
}
..
|
As shown in line 12, the management of received data is delegated to the profileDataReceived function.
It uses two parameters:
- the day of the week, coded according to the static method
getDayOfTheWeek(line 5) - the
profileDataarray, which essentially corresponds to the received notification value, excluding the two most significant bytes (that have already been used)
Basically, it is a matter of analyzing the two functions mentioned above, which allow to examine in depth the aspects
related to the semantics of each byte. The first one, allows us to understand how the days of the week are coded within
the application: 0 means Saturday, 1 means Sunday and so on.
public static DayOfWeek getDayOfWeek(byte b) {
    switch (b) {
        case (byte) 0:
            return DayOfWeek.SATURDAY;
        case (byte) 1:
            return DayOfWeek.SUNDAY;
        case (byte) 2:
            return DayOfWeek.MONDAY;
        case (byte) 3:
            return DayOfWeek.TUESDAY;
        case (byte) 4:
            return DayOfWeek.WEDNESDAY;
        case (byte) 5:
            return DayOfWeek.THURSDAY;
        default:
            return DayOfWeek.FRIDAY;
    }
}
The second one shows how to interpret all the remaining bytes. Here is the
original code extracted from the application. We report the main points to understand how it works.
public void profileDataReceived(DayOfWeek dayOfWeek, byte[] profileData) {

    //creates a list of pairs (temperature, time)
    List<ProfileDataPair> dataPairs = new ArrayList();

    for (i = 0; i < profileData.length; i += 2) {
        //reads two byte at a time and creates (temperature, time) pairs
        int time = (profileData[i + 1] & 255) * 10;
        dataPairs.add(new ProfileDataPair(((double) profileData[i]) / 2.0d, time));
        if (time == 1440) break;
    }

    //find the base temperature to keep outside the programmed ranges
    double baseTemperature = getBaseTemperature(dataPairs);
    ...

    //create a list of Period.
    //each Period contains the data of a range programmed by the user
    List<Period> periods = new ArrayList();

    for (i = 0; i < dataPairs.size(); i++) {

        ProfileDataPair pair = (ProfileDataPair) dataPairs.get(i); //get a Pair

        //if the temperature of the pair is different from the base temperature
        //then the user has entered a schedule for a certain period
        if (pair.temperature != baseTemperature) {

            Period currentPeriod = new Period(); //create a Period

            if(i>0){
                //the start time of the Period is the end of the previous pair
                currentPeriod.setStarttimeAsMinutesOfDay(((ProfileDataPair) dataPairs.get(i - 1)).time);
            }
            ...

            //no more than 3 periods can be set
            if (periods.size() < 3)
                periods.add(currentPeriod);
        }
    }

    ...
    //show the interpreted data in the application
}
We can therefore deduce that:
- The bytes of the received notification must be interpreted as consecutive pairs
(temperature, time). Each pair indicates the temperature to be kept until a certain time. - In each pair the time is multiplied by 10, while the temperature is divided by 2
- It is possible to identify the base temperature with the algorithm described by the function
getBaseTemperature - The ranges programmed by the user are those that don’t use the base temperature and are at most three.
This allows us to understand the meaning of the entire notification. An example of the possible values received is shown in the Notifications section dedicated to the valve protocol.
Finally, it is interesting to note how the code inside the package de.eq3.ble.android.api.command and the content
of the files concerning the management of notifications do not involve parameters related to the mode in which
the radiator valve is.
| [6] | Wikipedia - Class Diagram |
| [7] | Wikipedia - Integrated Development Environment |
| [8] | ArgoUml |
| [9] | Umbrello UML Modeller |
| [10] | BOUML |
| [11] | Modelio |
2.5. Other Useful Guides
2.5.1. Logging With An Emulator
As already mentioned and depending on your needs, there are various advantages in using an emulator. Among these:
- do not need a physical device to do the job
- possibility to easily have a specific OS or other features (e.g. root)
- do not put your privacy at risk by installing applications from untrusted sources
- sandboxing (for example through the use of Firejail)
The only “obstacle” that arises in the use of an emulator is due to the Bluetooth communication. However, it should be possible to perform logging and run the application through a virtual machine (like Virtualbox) and a BLE usb dongle.
This post can be a good point of reference. At the moment we have not been able to test this solution because the dongle we have available is not recognized by the virtual machine.
2.5.2. Similar Projects
Below we present some references concerning the reverse engineering of BLE devices. They are more focused on the network traffic than on the Android application, but they can still be useful because they deal with specific devices.
- Syska Smartlight Rainbow LED bulb
- MiPow Playbulb Candle
- Smart Bulb Colorific! light bulb
- NO 1 F4 Smart Band
- Fitbit BLE protocol
- Mikroelektronika Hexiwear